Friday, December 30, 2011

Seventh Step: Coloring in Photoshop-Part 2

After I had colored my background, I then filled in the rest of the characters with solid flat color.  To do this, I first created a new layer below my line work and above my background layers.  Then, with my new layer selected, I used the magic wand tool, and selected an area to color. 


I then made sure there was no space between my selection and black lines.  To do this, I clicked on Select-Modify-Expand and expanded my selection by 3 pixels.


I then used the paint bucket tool and filled my selection with color:


I used this method for the remaining areas and ended with this:


Here is a look at my layers palette after all of the areas had been filled with color:


Next Step:  Coloring in Photoshop-Part 3-Clororing Line


Sunday, December 18, 2011

eGift A Tooth For Tilly!


A Tooth For Tilly is now available for eGifting at Barnes and Noble and Amazon!


Giving a digital gift is quick and easy - we call it eGifting! NOOK Books and NOOK Apps can be eGifted to anyone with a valid email address. You do not need a NOOK to purchase a digital gift.

To eGift a NOOK Book or NOOK App, click the "Buy as Gift" link under the "Buy Now" button on the product page. You will have the opportunity to enter your gift recipient's email address and an optional gift message. You may preview the eGift email before purchasing. When you are ready to place your order, just click the "Buy Now" button.

Your eGift recipient will receive a notification of their gift at the email address you provide. You will receive an email notifying you when your eGift recipient has claimed their gift.

Click here to eGift A Tooth For Tilly at Barnes and Noble!


Amazon eGifting details:


Any Kindle book available for purchase in the Kindle Store can be given as a gift to anyone with an e-mail address. You do not need a Kindle device to send or receive Kindle book gifts, and the recipient can read their gift on a registered Kindle device or any free Kindle reading application.


To gift a Kindle book, click the Give as a Gift button located under the Buy button on Kindle Store product detail pages. You can also gift Kindle books through your recipient's Amazon Wishlist. 

For more info click here.

Click here to eGift A Tooth For Tilly at Amazon!

Wednesday, December 14, 2011

Sixth Step: Coloring in Photoshop-Part 1

Next, I exported my inked Illustrator images to my painting program, Photoshop.  I clicked on File-Export and saved my files accordingly.  Then I opened my first page in Photoshop.

Once I had opened my file, I saw one flat layer of line work. 


 I then opened a new file and set it at the correct dimensions for my book.  We had chosen a 7x7 square format, so I opened my new file to those dimensions.


I set my new file at 300 ppi, RGB Color and made sure i was using the correct color profile that Blurb recommended. 


After I had created a new file, I dragged the line layer onto the new blank 7x7 canvas. 


Then, I selected a new layer underneath my line layer for my background colors.  I chose a purple and gave it some gradients. 


I repeated this step for the ground color.  I chose a shade of green and then used a gradient.


Then I added in some grass I had created in Illustrator to the background.  I then lowered the opacity to 31%.


Next Step:  Coloring in Photoshop-Part 2

Friday, December 9, 2011

Fifth Step: Inking In Illustrator

After my images were placed and arranged, I started to outline my drawings.  I used a program called Illustrator to create my outlines.  I also used an Intuos 3 pen tablet by Wacom.  I learned how to ink my drawings through trial and error and tutorials I found online.  One of my favorite tutorials came from danidraws.com.  If you are interested in this process please visit her site and check it out!  Creating Line Drawings in Adobe Illustrator | Dani Jones • danidraws.com


Here is an example of one of my pages before and after it was outlined:
Before:


After:


Next Step:  Coloring in Photoshop

Wednesday, November 30, 2011

Fourth Step: Scanning Images and Creating a Sketch Collage in Illustrator

After I had created all of my sketches for my book, I then scanned each one into my computer.  I saved each image to a new folder as a jpeg.  Once I scanned all of my images I then opened my Illustrator program and created a new file.  My book format was 7x7 inches, so I opened my new file to 14x7.  This allowed me to work on two pages as one.  I drew a line down the middle to divide my pages.  I then opened the scanned images by clicking on file-place.  When all of my sketches were opened I then started to collage them according to the layout of those pages.  I used the opacity slider on some of my images.  This allowed me to overlap my drawings while being able to see everything at once.  I scaled each sketch and moved it into place accordingly until I felt it looked right.  
Illustrator Collage:


Next Step: Inking in Illustrator

Wednesday, November 16, 2011

Third Step: Designing Characters

After I drew my thumbnail sketches, I then began to sketch detailed images of each character.  I used my first drawing of the main character, Tilly, as reference for the other supporting characters in the story, since they resembled each other. (Sister and Mother)  Using this drawing and my thumbnail sketches as a guide, I drew all of the characters in different poses with different expressions.  I started by drawing very light and sketchy.  I often drew these poses over and over until I liked a certain drawing.  After I had the poses and expressions that I liked, I refined my images.
First Drawing Used As Reference:


Examples of Different Poses for Tilly: 


I also drew multiple poses for the Ladybug:


Background and extra elements were also drawn according to the layout of my thumbnails.  This included the apple, branches, leaves, flowers, etc.

Next Post:
Scanning Images and Creating a Sketch Collage in Illustrator

Wednesday, November 9, 2011

Second Step: Thumbnail Sketches

Prep:

Before I started creating my thumbnail sketches, I made sure I knew what size format I would need.  By choosing a format now, it would save me trouble later.  I wouldn’t have to worry about resizing my images to fit the formats that the self publishing sites offer.  I looked at different self-publishing sites and decided to go with Blurb.  For me it seemed like the most user friendly option.  The Booksmart program they have to create your book uses a very simple drag and drop feature.  Blurb also has quite a few book size choices.  For this book, we wanted it to be kid friendly and a comfortable size, so we decided to use the 7x7 square format.
Thumbnails:

After I knew the size of the book, I then created my thumbnail sketches.  The first set of thumbnails I drew were very rough.  I drew small square boxes that represented each page.  Then, I started to sketch in very rough shapes to get a feel for the design of each page.  I roughed in basic shapes that represented the main character, bits of the background, other characters that supported the text and also kept in mind where the text would fit on each page.  I drew a ton of different thumbnails over and over before deciding on a design that I liked.  
Creating the thumbnails also helped me know how many pages would be in the book.  Most picture books are roughly 24-32 pages.  Since we were creating this on our own, I felt we could make this book however short or long we wanted.  I also kept in mind the minimum amount of pages Blurb allows to be printed.  For a 7x7 book you can print as little as 20 pages.  As I created the thumbnails I sectioned off what I felt would be appropriate for each page.  After some experimenting, the final amount of illustrated pages came to about 18.  Adding the title page, copyright page, the dedication page and the end pages gave us a total of 24 pages.

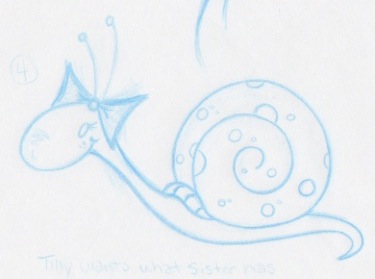
First Thumbnail Attempt:

A Few of the Final Thumbnails:


Once I felt that the design was working and the book was flowing from page to page, I then moved on to designing the rest of my characters.
Next Step:
Designing Characters

Monday, November 7, 2011

Thursday, November 3, 2011

First Step: Sketching the Main Character

The first step I took in creating the illustrations for the book, was to sketch the main character.  The main character was a baby girl snail named Tilly.  I sketched out quite a few versions of a baby snail until I found one that I liked the best.  I wanted her to have cute features and I wanted to keep the drawing fairly simple so that I could sketch her easily and consistently throughout the book. Here are just two of my first rejected attempts:


And the final:


I felt this design worked the best and was the cutest of the bunch.  Once the sketch of the main character was chosen, I moved on to the next step.
Next Step:  Thumbnail Sketches


(Check out the Tidbits tab for some extra info.)

Tuesday, October 25, 2011

Welcome!

Hello and welcome to my blog for A Tooth For Tilly!  A Tooth For Tilly is a book for baby to preschool ages. It is about a baby snail named Tilly who wants her very first tooth. Tilly wants to be able to enjoy all the foods her older sister can eat, but cannot just yet without her tooth. Through her mother’s comfort and kind words, she learns that with patience and time her tooth will grow!
This book was written by my Mom for her granddaughters and for all babies and parents who go through the journey of teething. She asked if I would create the illustrations and I thought it would be a great way to teach myself about illustrating.  I decided to start this blog for fun to document and share some of the process of how I created the illustrations, along with some of my experience with self-publishing through Blurb, making a Pubit book through Barnes and Noble and a Kindle book through Amazon.
If you’re interested in A Tooth For Tilly you can find it here:


Or check out the posts below!  :)

Sunday, October 16, 2011

$0.99 KINDLE EDITION!

A Tooth For Tilly is now available for download at Amazon!
Available for the Kindle, iPhone, PC, Mac, Blackberry, iPad, Android, 
and Windows Phone 7!

1)  Download the Free Kindle app for your device at Amazon.com.
                                     Kindle App!
2)  Sign in with your Amazon account or sign up for free.
3)  Buy Book and enjoy! A Tooth For Tilly! Kindle Edition
4)  Reviews and ratings are welcomed. :)

Thursday, October 6, 2011

$0.99 NOOK BOOK!

A Tooth For Tilly is now available for download at Barnes and Noble!
Available for the Nook, iPad, iPhone, Android, Pc and Mac.
*Not for iPhone 3 and below. 

1) Download the Free Nook App for your device:
                       Free Nook App!
2) Signup for a Free Barnes and Noble account.
3) Buy book and enjoy! A Tooth For Tilly! Nook Book
4) Reviews and ratings are welcomed.  :)